Why do we need labels in Kubernetes? #
labels:
  app: currency-exchange
  environment: prod
  tier: backend
  version: v1
  team: payments
billinggroup: finance- Key Value Pairs: Labels are key value pairs that can be attached with Kubernetes resources - Pods, Deployments, ReplicaSet, Service, ...
- Assign multiple labels: You can assign multiple labels to a single resource
- Why are Labels Needed?
- Logical Grouping of Resources: Labels allow you to group and organize resources (like Pods, Services, Deployments) - Grouping all resources belonging to
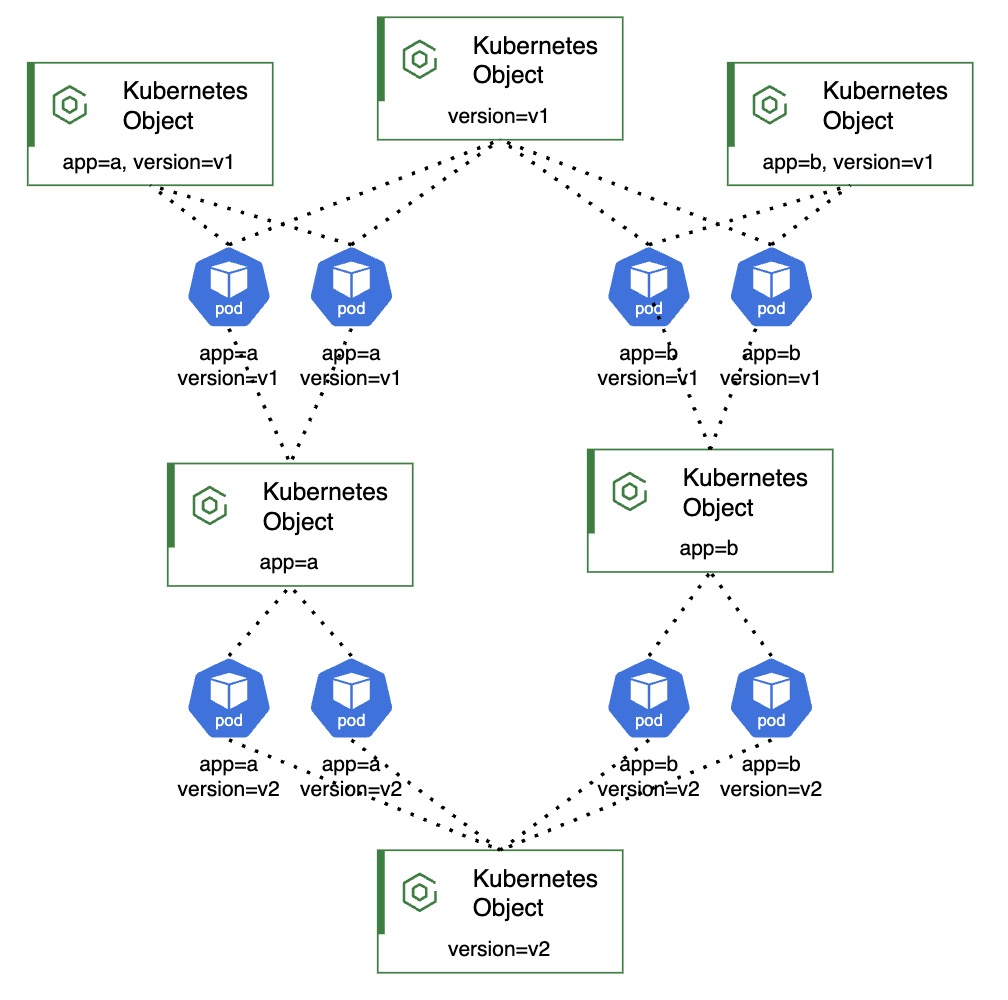
currency-exchangemicroservice withapp=currency-exchange - App Versioning: Use labels like
version=v1orversion=v2to track different versions of an application- Attach labels
app=currency-exchange version=v1with V1 andapp=currency-exchange version=v2with V2.
- Attach labels
- Route Traffic: Services use label selectors to route traffic to the correct set of Pods (A Service with
selector: app=currency-exchangeforwards traffic to both v1 and v2 pods. A Service withselector: app=currency-exchange & version=v1forwards traffic only to v1 pods) - Organize Workloads: Labels can categorize workloads by team, app, or function (e.g.,
team=frontend,app=webapp)
- Logical Grouping of Resources: Labels allow you to group and organize resources (like Pods, Services, Deployments) - Grouping all resources belonging to
- Provides A Lot of Flexibility for Operations
- Example 1: Delete all staging resources using
kubectl delete pod -l environment=staging - Example 2: Tools like Prometheus, Grafana can use labels to group, filter, and visualize metrics or logs - Show CPU usage grouped by
app,team, orversion - Example 3: Rollouts and Updates - Route 90% traffic to Pods with
version=v1, and 10% toversion=v2
- Example 1: Delete all staging resources using
Explain an Example Deployment YAML #
Simple Example
apiVersion: apps/v1                  # Deployment API
kind: Deployment                     # Resource type
metadata:
  name: currency-exchange            # Deployment name
spec:
  replicas: 2                        # Desired pod count
  selector:                          # Selector to match pods
    matchLabels:
      app: currency-exchange
  template:
    metadata:
      labels:
        app: currency-exchange       # Pod label(s)
        version: v1
    spec:                            # POD SPEC
      containers:
      - name: currency-exchange      # Container name
        image:                       # Container image
          in28min/currency-exchange:0.0.1-RELEASE
        ports:
        - containerPort: 8000        # Exposed port
Another Example
apiVersion: apps/v1                  # Deployment API
kind: Deployment                     # Resource type
metadata:
  name: currency-exchange            # Deployment name
spec:
  replicas: 2                        # Desired pod count
  selector:
    matchLabels:
      app: currency-exchange         # Match these pods
  template:
    metadata:
      labels:
        app: currency-exchange       # Pod label
    spec:
      containers:
      - name: currency-exchange      # Container name
        image:                       # Container image
          in28min/currency-exchange:0.0.1-RELEASE
        imagePullPolicy: IfNotPresent # Use local image if exists
        ports:
        - containerPort: 8000        # Exposed container port
        env:                         # Environment variables
        - name: CURRENCY_HOST        # Sample env variable
          value: currency-db         # Set its value
        resources:                   # Resource requests/limits
          requests:
            memory: "128Mi"          # Minimum memory
            cpu: "250m"              # Minimum CPU
          limits:
            memory: "512Mi"          # Max memory allowed
            cpu: "500m"              # Max CPU allowed
        readinessProbe:              # Checks if pod is ready
          httpGet:
            path: /ready             # Health endpoint
            port: 8000               # Probe port
          initialDelaySeconds: 10    # Wait before first check
          periodSeconds: 10          # Check interval
        livenessProbe:               # Checks if pod is alive
          httpGet:
            path: /live              # Health endpoint
            port: 8000               # Probe port
          initialDelaySeconds: 15    # Wait before first check
          periodSeconds: 20          # Check interval
Explain an Example Service YAML #
- Frontend: How to receive Traffic?
- Backend: Which Pods to match against?
apiVersion: v1                       # Core API group
kind: Service                        # Resource type
metadata:
  name: currency-exchange            # Service name
spec:
  selector:
    app: currency-exchange           # Target pods
    version: v1
  ports:
    - port: 8000                     # Service port
      targetPort: 8000              # Forward to this pod port
  type: LoadBalancer                 # External access
What do selectors do in Kubernetes? #
Example 1
- Deployments and Services are mapped directly to Pods!
apiVersion: apps/v1                  # Deployment API
kind: Deployment                     # Resource type
metadata:
  name: example-deployment           # Deployment name
spec:
  selector:
    matchLabels:                     # Pod selector
      app: demo                      # Match label app=demo
  template:
    metadata:
      labels:
        app: demo                    # Pod label app=demo

---

apiVersion: v1                       # Service API
kind: Service                        # Resource type
metadata:
  name: example-service              # Service name
spec:
  selector:
    app: demo                        # Match Pods with app=demo
Example 2
- demo-v1 and demo-v2 are two separate Deployments with version labels
- demo-service sends traffic to both versions (v1 and v2)
- demo-service-v1 sends traffic only to Pods labeled version: v1
# Step 1: Deployment for version v1
apiVersion: apps/v1                  # Deployment API
kind: Deployment                     # Resource type
metadata:
  name: demo-v1                      # Deployment name
spec:
  replicas: 2                        # Number of Pods
  selector:
    matchLabels:                     # Select Pods with...
      app: demo                      # app=demo
      version: v1                    # version=v1
  template:
    metadata:
      labels:                        # Labels for Pods
        app: demo                    # App label
        version: v1                  # Version label

---

# Step 2: Deployment for version v2
apiVersion: apps/v1
kind: Deployment
metadata:
  name: demo-v2
spec:
  replicas: 2
  selector:
    matchLabels:
      app: demo
      version: v2
  template:
    metadata:
      labels:
        app: demo
        version: v2

---

# Step 3: Generic Service (targets both v1 and v2)
apiVersion: v1                       # Service API
kind: Service                        # Resource type
metadata:
  name: demo-service                 # Service name
spec:
  selector:                          # Match all versions
    app: demo                        # with label app=demo
  ports:
    - port: 80                       # Service port
      targetPort: 8080              # Pod container port
  type: ClusterIP                    # Internal-only access

---

# Step 4: Version-specific Service (targets only v1)
apiVersion: v1
kind: Service
metadata:
  name: demo-service-v1
spec:
  selector:                          # Match v1 only
    app: demo
    version: v1
  ports:
    - port: 80
      targetPort: 8080
  type: ClusterIP
Selectors Give You a Lot of Flexibility
# Basic matchLabels
selector:
  matchLabels:
    app: demo                    # Match app=demo

---

# matchLabels with multiple key-values
# app=demo AND version=v1
# Best for Straightforward exact matches
selector:
  matchLabels:
    app: demo                    # Match app=demo
    version: v1                  # Match version=v1

---

# matchExpressions
# A flexible way to define label selectors
# Supports multiple operators:
#  In, NotIn, Exists, DoesNotExist
# (app == blog OR app == shop) AND (version == v1)
selector:
  matchExpressions:
    - key: app
      operator: In
      values:
        - blog
        - shop                   # Match blog or shop
    - key: version
      operator: In
      values:
        - v1                     # Match version=v1

---

# matchExpressions - NotIn operator
selector:
  matchExpressions:
    - key: env
      operator: NotIn
      values:
        - dev                    # Not environment=dev

---

# matchExpressions - Exists operator
selector:
  matchExpressions:
    - key: region
      operator: Exists           # region key must exist

---

# matchExpressions - DoesNotExist operator
selector:
  matchExpressions:
    - key: debug
      operator: DoesNotExist     # debug key must not exist

---

# matchExpressions - combine In and Exists
selector:
  matchExpressions:
    - key: app
      operator: In
      values:
        - demo
    - key: team
      operator: Exists           # team label required

---

# matchExpressions - combine NotIn and Exists
selector:
  matchExpressions:
    - key: env
      operator: NotIn
      values:
        - staging
    - key: role
      operator: Exists           # role label required

---

# Combination: matchLabels + matchExpressions
# (app == api) AND (version in (v1, v2))
selector:
  matchLabels:
    app: api                     # matchLabels part
  matchExpressions:
    - key: version
      operator: In
      values:
        - v1                     # matchExpressions part
        - v2
What is the declarative approach in Kubernetes? #
- Manifests as Source of Truth: Users create YAML or JSON files (called manifests) describing the desired state of Kubernetes resources like Deployments, Services, and ConfigMaps
- Submitted via
kubectl apply: The manifest files are submitted to the Kubernetes API Server using commands likekubectl apply -f <file>.yaml - API Server as Entry Point: The Kubernetes API Server validates and stores these resource definitions in etcd, the cluster’s data store
- Controller Loop Logic: Built-in controllers (like ReplicaSetController) continuously compare the desired state (from etcd) with the actual cluster state
- Reconciliation in Action: When a mismatch is detected (e.g., a Pod crashes), the controller takes action (e.g., recreates the Pod) to bring the actual state back to the declared desired state
- Declarative Updates: Changes to the manifest files and reapplying them cause Kubernetes to gradually reconcile the state
- Stateless Execution: Controllers do not maintain execution history or steps — they always observe the current state and try to reconcile
Why is the declarative approach useful? #
- Desired State Management: You declare what you want (e.g., 3 replicas), and Kubernetes works continuously to match the actual state with the desired state
- Idempotent Configuration: Reapplying the same YAML file has no side effects, ensuring repeatable and safe deployments
- Version Control: YAML files can be version-controlled, enabling audit trails and rollback
- Environment Consistency: The same configuration can be reused across dev, staging, and prod environments, ensuring predictable behavior
- Simplified Troubleshooting: Kubernetes exposes current and desired state through CLI, making it easier to diagnose problems
- Seamless Automation: Declarative configs integrate easily with CI/CD pipelines and automation tools
What are Namespaces? #
apiVersion: apps/v1
kind: Deployment
metadata:
  name: demo
  namespace: my-namespace
# Other details

# View all namespaces
# kubectl get namespaces

# Run commands in a specific namespace
# kubectl get pods -n my-namespace- Namespaces: Kubernetes resources can be assigned a namespace
- Default Namespace: If no namespace is specified, Kubernetes assigns objects to the
defaultnamespace
- Default Namespace: If no namespace is specified, Kubernetes assigns objects to the
- Logical Separation: Provide a way to group cluster resources logically making management easier
- Use cases:
- Multi-Tenancy: Enables isolation of resources between different teams or projects within the same cluster
- Environment Segmentation: Isolates different environments (e.g.,
staging,testing) to prevent impact on production - Access Control: Allows fine-grained RBAC, restricting user access to specific namespaces
- Example: Developers with full access in
developmentbut limited access inproduction
- Example: Developers with full access in
- Resource Management: Sets resource limits for namespaces to prevent overuse
- Example: CPU and memory quotas for different namespaces
- Shared Resources: Common resources can be shared across multiple namespaces
- Example: Monitoring, logging or ingress controllers
# Namespace for Dev team workloads and resources
apiVersion: v1
kind: Namespace
metadata:
  name: dev-team
  labels:
    team: dev
    environment: development
---
# Namespace for Production workloads
apiVersion: v1
kind: Namespace
metadata:
  name: prod-team
  labels:
    team: prod
    environment: production
---
# ResourceQuota to cap total compute use in dev-team
# Helps prevent runaway resource consumption
apiVersion: v1
kind: ResourceQuota
metadata:
  name: compute-limits
  namespace: dev-team
  labels:
    policy: enforced
spec:
  hard:
    requests.cpu: "2"      # Up to 2 CPUs can be requested
    requests.memory: 4Gi   # Up to 4Gi memory requested
    limits.cpu: "4"        # Absolute CPU limit for all pods
    limits.memory: 8Gi     # Absolute memory cap for all pods
Namespace Scenarios #
- Scenario: What happens if I don't specify a namespace?
- The object is created in the
defaultnamespace
- The object is created in the
- Scenario: Service Discovery fails across namespaces
- Use FQDN: my-service.my-namespace.svc.cluster.local
- Scenario: A Pod/Service not found when searching
- Possible Cause: You're looking in the wrong namespace
- Fix: Add
-n <namespace>or use--all-namespaces
What is the need for Gateway API? #
- Modern Alternative to Ingress: Gateway API is a new way to manage traffic into Kubernetes. It's more flexible and powerful than the old Ingress API.
- Supports More Than HTTP: It works with HTTP, HTTPS, TCP, UDP, gRPC, and TLS—not just web traffic.
- Clear Team Roles: Platform teams manage Gateways, while app teams define routes like
HTTPRoute. - Reusable Gateway Configs:
GatewayClasslets you define shared settings for Gateways—just like StorageClasses for volumes. - Safe for Shared Clusters: Routes from different namespaces can safely share the same Gateway.
- Built for Extensibility: It uses standard CRDs, so vendors like NGINX or Istio can add features without breaking compatibility.
- Better Debugging Info: It gives clear status updates, making it easier to monitor and troubleshoot.
Can you show a Gateway Multi-tenant Traffic Routing example? #
Let's create a shared Gateway in the infra namespace that can accept traffic from the internet and route it to multiple teams' services across namespaces.
# OVERVIEW
# FLOW: Internet
# -> Gateway (port 80, in namespace 'infra')
# -> HTTPRoute (/app in namespace 'team-a',
#                     /metrics in namespace 'team-b')
# -> Service (in team-a and team-b)
#
#
---
# WHAT: Defines a reusable gateway configuration
# BACKGROUND: Gateway controller detects it
# The controller takes ownership of any Gateway objects
# that reference this GatewayClass.
# No infra is provisioned YET!
apiVersion: gateway.networking.k8s.io/v1
kind: GatewayClass
metadata:
  name: shared-gateway-class
spec:
  controllerName: nginx.org/gateway-controller

---
# WHAT: Shared external entry point defined in 'infra'
# BACKGROUND: Gateway Controller configures the
# Gateway (NGINX, Envoy, Cloud LoadBalancer, ..)
# to listen on the configured port
apiVersion: gateway.networking.k8s.io/v1
kind: Gateway
metadata:
  name: shared-gateway
  namespace: infra
spec:
  gatewayClassName: shared-gateway-class

  listeners:
    - name: http
      protocol: HTTP
      port: 80
      allowedRoutes:
        namespaces:
          from: All
      # Allows HTTPRoute objects from any namespace to bind

---
# WHAT: Routing rules created in 'team-a' namespace
# BACKGROUND: This HTTPRoute links the shared Gateway
# Gateway (NGINX, Envoy, Cloud LoadBalancer, ..)
# is updated
# Match any HTTP request with prefix /app
# Forward requests to `my-app-service`
apiVersion: gateway.networking.k8s.io/v1
kind: HTTPRoute
metadata:
  name: route-to-app
  namespace: team-a
spec:
  parentRefs:
    - name: shared-gateway
      namespace: infra
  rules:
    - matches:
        - path:
            type: PathPrefix
            value: /app
      backendRefs:
        - name: my-app-service # PRE EXISTING SERVICE
          port: 80

---
# WHAT: Second route from 'team-b' namespace
# BACKGROUND: This HTTPRoute also attaches to the
# shared Gateway and matches /metrics. Shows how
# multiple teams can use one Gateway.
apiVersion: gateway.networking.k8s.io/v1
kind: HTTPRoute
metadata:
  name: route-to-metrics
  namespace: team-b
spec:
  parentRefs:
    - name: shared-gateway
      namespace: infra
  rules:
    - matches:
        - path:
            type: PathPrefix
            value: /metrics
      backendRefs:
        - name: metrics-service # PRE EXISTING SERVICE
          port: 80
How is Gateway different from Ingress? #
| Feature | Ingress | Gateway API |
|---|---|---|
| Protocol Support | HTTP/HTTPS only | HTTP, HTTPS, TCP, etc. |
| Path Matching | ✅ Yes | ✅ Yes |
| Role Separation | ❌ No | ✅ Yes (Infra teams manage GatewayClass & Gateway App teams define HTTPRoute, TCPRoute, etc.) |
| Extensibility (CRDs) | ❌ No | ✅ Yes |
| Multi-Tenancy Support | 🚫 Limited | ✅ Namespaced Routes |
| Status Reporting | ⚠️ Minimal | ✅ Detailed |
What are the scaling options in Kubernetes? #
Why Scaling in Kubernetes?
- Ensure availability and performance as load varies
- Optimize resource usage and cost
- Automate infrastructure management
- Prevent over/under-provisioning
Scaling Options
| Scaling Layer | What It Scales | Example Resource |
|---|---|---|
| Pod-level (Horizontal) | Number of Pod replicas | HorizontalPodAutoScaler (HPA) |
| Pod-level (Vertical) | CPU/Memory of each Pod | VerticalPodAutoScaler (VPA) |
| Cluster-level | Number of Nodes in cluster | Cluster AutoScaler |
What is Horizontal Pod AutoScaler (HPA)? #
- Purpose: Automatically scales the number of Pod replicas in a Deployment based on observed metrics (CPU, memory, or custom)
- Requirement: Metrics Server add-on should be installed & running to expose Pod or Node CPU/memory usage
Example:
# HPA for scaling the 'web-app' deployment based on CPU
apiVersion: autoscaling/v2
kind: HorizontalPodAutoScaler
metadata:
  name: web-app-hpa               # HPA resource name
spec:
  scaleTargetRef:                 # Target resource to scale
    apiVersion: apps/v1           # API version of target
    kind: Deployment              # Target is a Deployment
    name: web-app                 # Name of the target
  minReplicas: 2                  # Minimum number of pods
  maxReplicas: 10                 # Maximum number of pods
  metrics:                        # Metrics to base scaling on
  - type: Resource                # Use resource-based metric
    resource:
      name: cpu                   # Metric is CPU utilization
      target:
        type: Utilization         # Target type: Utilization
        averageUtilization: 50    # Desired average: 50% CPU
What is Vertical Pod AutoScaler? #
- Purpose: Automatically recommends or updates CPU/memory resource requests & limits for Pods, adjusting “vertically” instead of adding replicas
- Requirement: A component exposing the resource.metrics.k8s.io API (commonly the Metrics Server) must be running so VPA can fetch per-container CPU and memory usage data
- Needs VPA Controllers: VPA Controllers need to be installed
Modes:
- Off: No changes to pods; just stores/suggests recommendations and can be inspected in the VPA object
- Initial: Sets recommended resources only at pod creation. Does not evict or update existing pods
- Recreate: Sets recommended resources when new pods are created and evicts existing pods when the requested resources differ significantly from the new recommendation (respecting the PDBs, if defined)
- Auto(Deprecated): Equivalent to
Recreate- will be removed in a future API version - InPlaceOrRecreate(alpha feature): Assigns resource requests on pod creation as well as updates them on existing pods by leveraging Kubernetes
in-place updatecapability
# VPA to auto-adjust resources for 'web-app' pods
apiVersion: autoscaling.k8s.io/v1
kind: VerticalPodAutoscaler
metadata:
  name: web-app-vpa               # VPA resource name
spec:
  targetRef:                      # Target to apply VPA on
    apiVersion: apps/v1           # Target API version
    kind: Deployment              # Kind: Deployment
    name: web-app                 # Name of the deployment
  updatePolicy:
    updateMode: "Recreate"        # Use explicit mode
                                  # instead of deprecated "Auto"
  resourcePolicy:
    containerPolicies:
    - containerName: "*"          # Applies to all containers
      minAllowed:                 # Minimum resource limits
        cpu: "100m"               # At least 100 millicores
                                  # (0.1 vCPU)
        memory: "128Mi"           # At least 128Mi memory
      maxAllowed:                 # Maximum resource limits
        cpu: "1"                  # No more than 1 CPU
        memory: "1Gi"             # No more than 1Gi memory
How is HPA different from VPA? #
| Aspect | HPA | VPA |
|---|---|---|
| Purpose | Scales the number of pod replicas based on load | Adjusts CPU and memory resources for pods dynamically |
| Scaling | Mechanism Adds/removes pod replicas to meet demand | Increases/decreases resources (CPU/memory) of individual pods |
| Integration | Built-in to Kubernetes by default | Not built-in; must be installed separately as an add-on |
| Impact on Pods | Creates/destroys pods to handle load | Applies resource limits on new pods. Might terminate pods(Mode: Initial) . |
| Typical Metrics Used | CPU, memory, or custom metrics | Historical resource usage (CPU/memory) |
| Benefit | Ensures high availability by scaling replicas | Prevents over/under-provisioning of resources per pod |
What is Cluster AutoScaler? #
- Cluster AutoScaler: Kubernetes component that automatically adjusts the number of nodes in your cluster based on the pending workload.
- If Pods can’t be scheduled due to insufficient resources, it adds nodes
- If nodes are underutilized and their Pods can be moved elsewhere, it removes nodes
- Integrates with Cloud API: Works directly with your cloud provider's API (e.g., AWS, GCP, Azure) to scale infrastructure (not just Pods)
- How It Works:
- Scale Up:
- A new Pod is unschedulable (e.g., not enough memory or CPU)
- AutoScaler looks for a suitable node group and requests a new node
- Scale Down:
- A node is underutilized (low CPU/memory)
- Pods can be moved to other nodes
- If safe, the node is drained and removed
- Scale Up:
- Supported Cloud Providers: Google Cloud (GKE), Amazon Web Services (EKS), Microsoft Azure (AKS), ...
How does HPA compare to VPA and Cluster AutoScaler? #
| Feature | HPA | VPA | Cluster AutoScaler |
|---|---|---|---|
| Scales | Pod replicas | Pod CPU/memory requests | Cluster nodes |
| Metrics Used | CPU, memory, custom | Historical usage | Scheduling status |
| Cloud Integration Needed | No | No | Yes |
| Setup Complexity | Low | Medium | Medium |
What are some alternatives to Cluster AutoScaler? #
Karpenter
- Karpenter is an autoscaler from AWS that quickly adds new nodes to your cluster when needed — designed to replace the older Cluster Autoscaler
- Faster scaling: Reacts in seconds when Pods can’t be scheduled, instead of waiting minutes like Cluster Autoscaler
- No need for node groups: Karpenter automatically picks the right instance type, so you don’t have to manage node pools
- Cost-efficient with Spot support: It can use cheaper Spot Instances and safely handle interruptions to save money
- Open and flexible: Though built for AWS (EKS), Karpenter is open source and can be extended to other cloud platforms
Fully managed Kubernetes Managed Services
- Serverless Node Provisioning (Fargate, ACI, GKE Autopilot): Fully managed Kubernetes execution environments provided by cloud platforms that abstract away infrastructure provisioning;
- AWS Fargate for Amazon EKS and ECS
- Azure Container Instances (ACI) with AKS virtual nodes
- GKE Autopilot offering fully-managed Kubernetes clusters without exposing node infrastructure
- Zero Infrastructure Management: Developers can deploy workloads without worrying about node pools, instance types, or scaling policies; the cloud provider dynamically provisions and scales resources to match the workload's needs