What is a Dockerfile? How do you build a Docker image? #
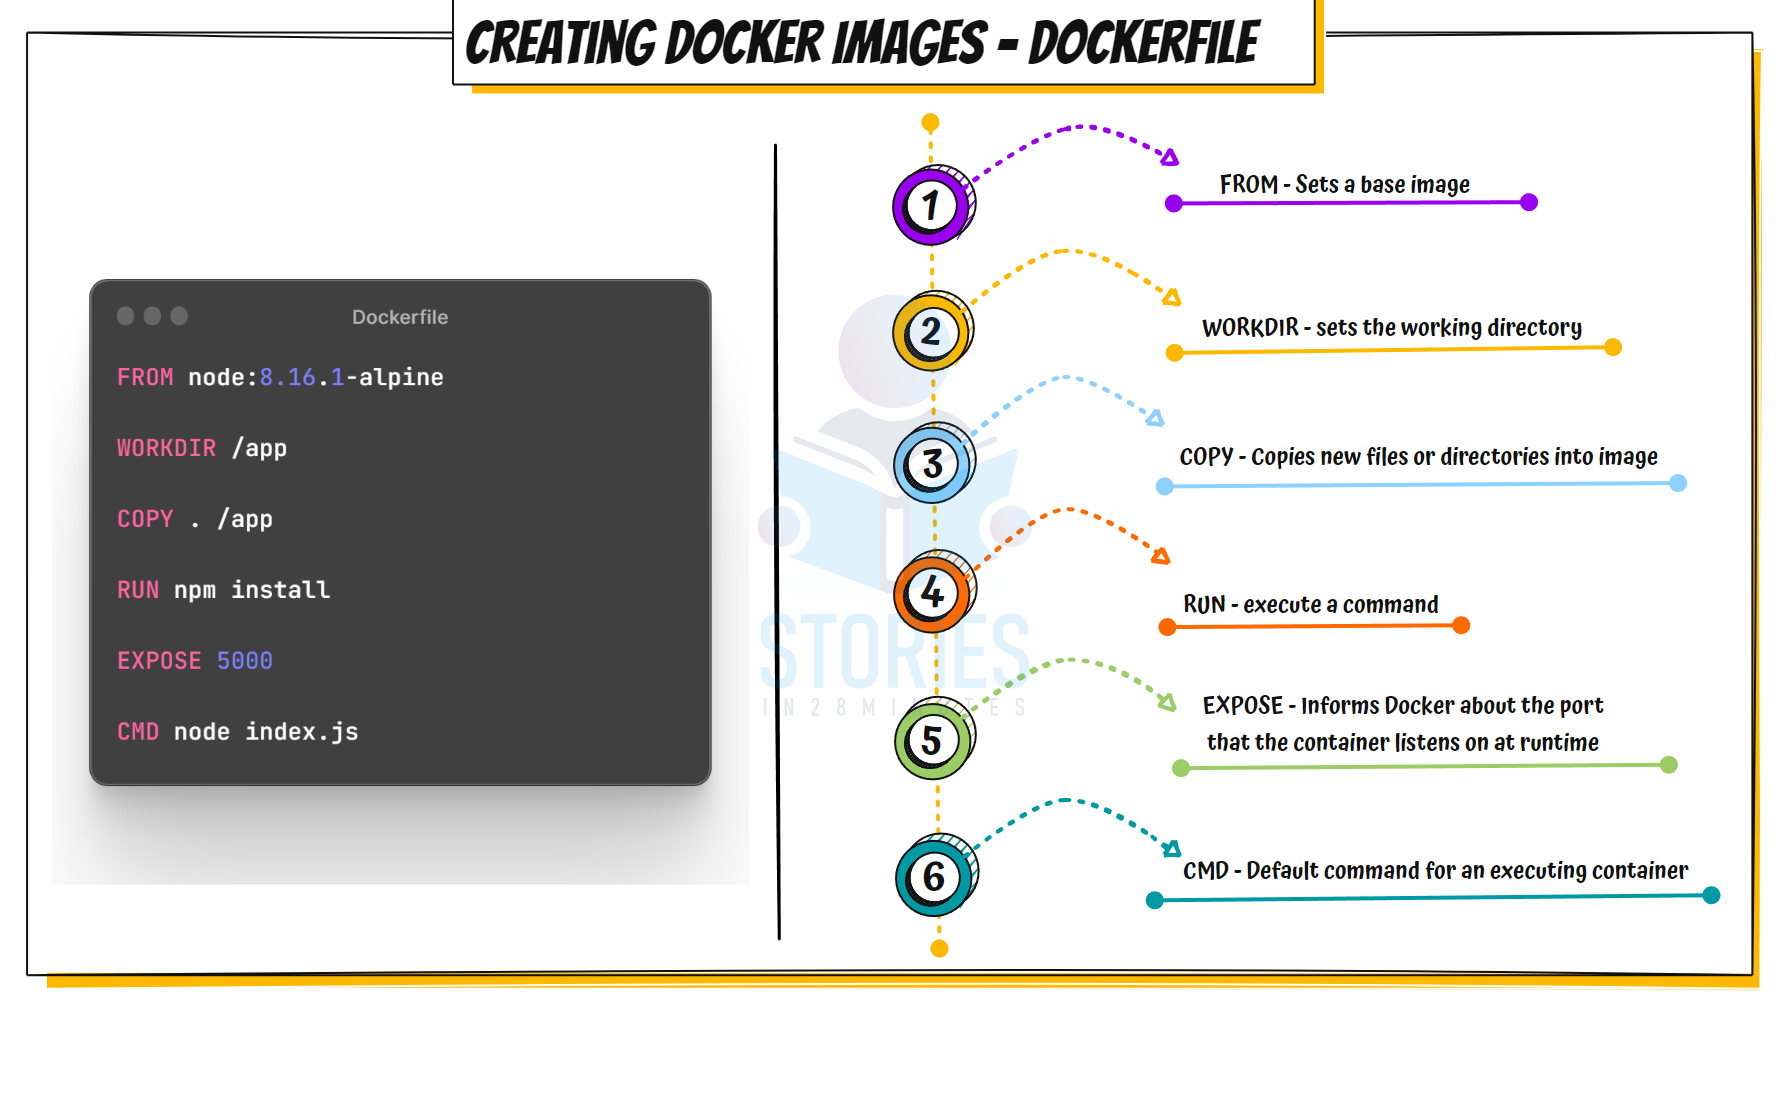
Dockerfile: A file containing a series of instructions on how to build a Docker image
Example:
Dockerfile
# Use an official Python runtime as the base image
FROM python:3.8-slim

# Sets the working directory inside the container
# Conceptually similar to `cd` command
WORKDIR /app

# Copies files/directories from the host to the container
COPY . /app

# Install any needed packages specified in requirements.txt
RUN pip install --no-cache-dir -r requirements.txt

# Exposes a port for external access
# Make port 80 available to the world outside this container
EXPOSE 80

# Define the command to run the application
CMD ["python", "app.py"]- Build the image using:
docker build -t my-python-app .- Create container from the image:
docker run -d -p 80:80 my-python-app

# Test
curl http://localhost
💡 Explore the following projects with detailed guides:
Example:
What is a Base Image? #
- Starting Point for Builds: Provides an initial starting point to build your container images
- Add Custom Things: Add your application code, dependencies, and configurations
- Huge Variety: You have a variety of Base Images
- OS Images: Examples include ubuntu:22.04, debian:12, alpine:3.20;
- Language Runtimes: Examples include openjdk:28-jdk-slim, node:30-alpine, python:4.12-slim; these come with pre-installed runtime environments
- Minimal & Secure Options: Such as alpine:3.20 or gcr.io/distroless/java21; they are tiny and have a smaller attack surface
- Blank Slate: The 'scratch' image gives a completely empty starting point for maximum control
Why is the Base Image a Key Choice? #
- Size: Smaller images lead to faster downloads and less storage usage
- Security: Choosing a minimal and well-maintained image reduces vulnerability risks
- Performance: Influences startup time and runtime efficiency of your container
- Community Support: Popular images often have better documentation and troubleshooting resources
What is the difference between ENTRYPOINT and CMD in a Dockerfile? explain with example #
-
ENTRYPOINT: Defines the main executable- Main executable: Sets the container's primary command
- Not easily overridden: Not overridden by arguments unless
--entrypointis used.
-
CMD: Default arguments to the ENTRYPOINT- Default execution: Provides default arguments for container run
- Can be easily overridden: Can be overridden by arguments passed to
docker run.
ENTRYPOINT Example:
#// Use an official Python runtime as a parent image
FROM python:3.8-slim

# Set the working directory
WORKDIR /app

# Copy the current directory contents into the container
COPY . /app

# Install dependencies
RUN pip install --no-cache-dir -r requirements.txt

# Set the entrypoint to run the Python interpreter with app.py
ENTRYPOINT ["python", "app.py"]ENTRYPOINTinstruction sets the entry point for the container aspython app.py- When the container starts, it will run
python app.pyby default, and you cannot change this behavior by passing arguments to docker run - To override the
ENTRYPOINT, you need to use the--entrypointflag with docker run:
docker run --entrypoint /bin/bash myimageENTRYPOINT + CMD:
# Use an official Python runtime as a parent image
FROM python:3.8-slim

# Set the working directory
WORKDIR /app

# Copy the current directory contents into the container
COPY . /app

# Install dependencies
RUN pip install --no-cache-dir -r requirements.txt

# Set the entrypoint to run the Python interpreter
ENTRYPOINT ["python"]

# Define the default argument to run
CMD ["app.py"]- This Dockerfile sets
ENTRYPOINTtopythonandCMDtoapp.py- When the container starts, it will run
python app.py - You can override the CMD argument like this:
docker run myimage another_script.py
- When the container starts, it will run
CMD Alone Example:
# Use an official Python runtime as a parent image
FROM python:3.8-slim

# Set the working directory
WORKDIR /app

# Copy the current directory contents into the container
COPY . /app

# Install dependencies
RUN pip install --no-cache-dir -r requirements.txt

# Define the default command to run when the container starts
CMD ["python", "app.py"]- The
CMDinstruction specifies that the container should runpython app.pyby default - You can override this command by specifying a different command when you run the container
docker run myimage python another_script.pyDifference between ADD and COPY in a Dockerfile #
COPY: Simply copies files and directories from the host to the containerADD: More powerful. Can copy files and directories and also supports URL downloads and automatic extraction of compressed files
Example:
# Copy a local file into the /app directory in the image
COPY localfile.txt /app/

# Download a file from a URL
# and unzip it into the /app directory in the image
ADD http://example.com/file.tar.gz /app/
How do you tag a Container image? Why is tagging important? #
- Tagging Command: Use
docker build -t imagename:tag .to assign a tag - Importance:
- Version Control: Helps identify image versions
microservice-a:v1,microservice-a:v2,microservice-a:v3mysql:5.7, mysql:6.0openjdk:8.0.0,openjdk:25.0.0
- Rollbacks: Easily revert to older versions of your image if newer ones fail
- Flexibility: Gives teams flexibility w.r.t. deploying different versions in different environments (dev, staging, prod).
- Multiple Tags: You can have multiple tags for an image
latestto indicate the latest version. Whoever want to use the latest version always can use the latest tag.myapp:latest
- Version Control: Helps identify image versions
Example:
# Build an myapp image with a tag 1.0.0
docker build -t myapp:1.0.0 .

# You can have multiple tags for an image
# Add additional tag latest to myapp image with tag 1.0.0
docker tag myapp:1.0.0 myapp:latest
Explain the layered approach to building a Container image? #
- Layered builds: Container images are created in layers
- Example: Most instructions in a Dockerfile, such as
FROM,RUN,COPY, create a new, read-only layer on top of the previous one. - Why is this important?
- Layers are cached: Layers are cached for faster and more efficient builds
- However Be Cautious: Changing one layer triggers a rebuild of subsequent layers
- Example Below: In Changed Dockerfile, Every layer from
Instruction 2 CHANGEDis rebuilt again
Example Dockerfile
Instruction 1
Instruction 2
Instruction 3
Instruction 4
Instruction 5
Instruction 6
Changed Dockerfile
Instruction 1
Instruction 2 CHANGED
Instruction 3
Instruction 4
Instruction 5
Instruction 6
How can you design Dockerfiles to maximize layer reuse? #
- Application code changes often: In applications, code changes often, libraries/dependencies change infrequently
- Application code evolves to add new features, fix bugs, and adapt to changing requirements
- Libraries and dependencies, on the other hand, tend to have more stable APIs and are updated less frequently, often for security patches, performance improvements, or new features
- Recommended: Build Layers with Libraries and Dependencies First and Code Later
Non-Optimized Dockerfile:
# Use an official Node.js runtime as a parent image
FROM node:24

# Set the working directory
WORKDIR /usr/src/app

# Copy application code + dependencies files
COPY . .

# Install dependencies - TAKES TIME!
RUN npm install

# Expose the application port
EXPOSE 3000

# Run the application
CMD ["node", "app.js"]- In this Dockerfile, the
COPY . .command copies the entire application code (app.js,...) + dependencies files (package.jsonandpackage-lock.json) before running npm install - This means any change in the application code (even a small one) will cause Docker to invalidate the cache for the
COPY . .instruction and all subsequent instructions, leading to frequent rebuilds of the npm install step
Optimized Dockerfile
# Use an official Node.js runtime as a parent image
FROM node:24

# Set the working directory
WORKDIR /usr/src/app

# Copy only package.json and package-lock.json first
COPY package*.json ./

# Install dependencies - TAKES TIME!
RUN npm install

# Copy the rest of the application code
COPY . .

# Expose the application port
EXPOSE 3000

CMD ["node", "app.js"]- In this optimized Dockerfile,
package.jsonandpackage-lock.jsonfiles are copied first - The
RUN npm installstep runs only if dependencies change (package.jsonorpackage-lock.json)RUN npm installwill NOT if ONLY application code (app.js,...) changes!
- The
COPY . .command copies the rest of the application code after installing dependencies. - This ensures changes to the application code do not affect the dependencies layer, allowing Docker to cache the
npm installstep unlesspackage.jsonorpackage-lock.jsonchange
What is a multi-stage build, and how can it be used to reduce the size of a container image? #
- Scenario: Imagine needing a full compiler or SDK to build your app — but once it’s built, you only need the tiny binary to run it. Do you really want to ship all that extra baggage in production? There’s a better way.
- Multi-Stage Build: A Docker technique that lets you use multiple images in one
Dockerfile— one for building your app and another for running it - Build Big, Run Small: Use a larger image (like
node,maven, orgolang) to compile your app — then copy just the final output into a much smaller runtime image - Reduces Image Size Dramatically: Final image contains only what’s necessary to run the app — no compilers, dev tools, or source code
- Improves Security by Design: Smaller images have fewer vulnerabilities because they include fewer packages and libraries
- Makes CI/CD More Efficient: Smaller images mean faster downloads, deployments, and less storage usage across environments
- How Does It Work?:
- Multiple FROM statements: Each FROM starts a new build stage
- Artifact copying: Transfer only necessary artifacts between stages to keep the final image small
Golang Example 1: Larger Image Size Final image includes unnecessary build tools, making it larger than needed
FROM golang:1.16

WORKDIR /app

COPY main.go .

RUN go build main.go

CMD ["./main"]
Golang Example 1: Multi Stage Build Separate build stage, copy only compiled binary to minimal base
# Stage 1: Build the Go application
FROM golang:1.16 AS builder

WORKDIR /app

COPY main.go .

RUN go build main.go

# Stage 2: Create a minimal image with the built binary
FROM alpine:latest  # MINIMAL BASE IMAGE

WORKDIR /root/

COPY --from=builder /app/main . # COPY WHAT WE WANT!

CMD ["./main"]
Is it possible to make changes to an existing Container image? #
- Read-only design: Container images are immutable — you cannot directly modify them.
- This ensures consistency, reproducibility, and follows the principle of immutable infrastructure.
- Commit changes: However, Modifications can be made to a running container and then committed to create a new image
- New image creation: Instead of updating the existing image, a new one is created, following immutable infrastructure principles
Example: Commit changes from container & Create new image
- Step 1: Run a container from the
nginx:latestimage
docker run --name test1 -d -p 80:80 nginx

# Test
curl http://localhost:80- Step 2: Modify the running container
docker exec test1 sh -c \
'echo "<h1 style="font-size:400px">Testing</h1>" > /usr/share/nginx/html/index.html'

# Test
curl http://localhost:80- Step 3: Create new container image from running container
docker commit test1 newnginx:modified- Step 4: Run a container from the
newnginx:modifiedimage (newly created)
docker run --name test2 -d -p 81:80 newnginx:modified

# Test
curl http://localhost:81
What is the purpose of the .dockerignore file? #
- Exclude files:
.dockerignoreprevents specific files and directories from being copied into the Container image during the build and make image lightweight - Pattern matching: Define file and directory patterns (similar to .gitignore)that Docker should skip during the build process
Example .dockerignore File:
# Ignore node_modules directory
node_modules

# Ignore log files
*.log

# Ignore development or editor-specific files
.DS_Store
.vscode/
.idea/
What Are Alternatives to Writing Dockerfile? #
- Manual Dockerfile Challenges: Writing good Dockerfile is challenging
- Mistakes can lead to security issues, large images and long build times (inefficient caching)
- Jib: Java-specific tool that eliminates the need for Dockerfiles
- Layer Caching: Built-in optimization to speed up image building process
- Security Features: Reduce risks by automating best practices
- Buildpacks: Multi-language support (Java, Node.js, Python, etc.), no Dockerfile required
- Layer Caching: Built-in optimization to speed up image building process
- Security Features: Reduce risks by automating best practices
- Language Compatibility: Supports a variety of programming languages
# Build a Java image with JIB
mvn compile com.google.cloud.tools:jib-maven-plugin:build \
  -Dimage=gcr.io/my-project/my-app

# Build a Java image with packeto build pack
pack build my-spring-app \
  --builder paketobuildpacks/builder:base \
  --env BP_JVM_VERSION=24 \
  --env BP_LOG_LEVEL=debug

# Use Spring Boot Maven Plugin (Uses packeto build pack)
mvn spring-boot:build-image
What is OCI and Why Is It Important? #
- Problem Before OCI: Proprietary formats led to vendor lock-in and limited interoperability
- Open Container Initiative(OCI): Defines open, vendor-neutral specifications for containers
- Image Spec: Standard format for container images
- Runtime Spec: Standardization for running containers across different platforms
- Distribution Spec: Standardized methods for pushing and pulling images through container registries (Supported by Docker Hub, Google Artifact Registry, Amazon Elastic Container Registry, ...)
- Open Governance: Managed by the Linux Foundation, ensuring open collaboration and transparency
- OCI is Supported By Almost All Container Based Tools and Cloud Platforms: Docker, Podman, Buildpacks, Kubernetes, containerd, AWS, Azure, Google Cloud